
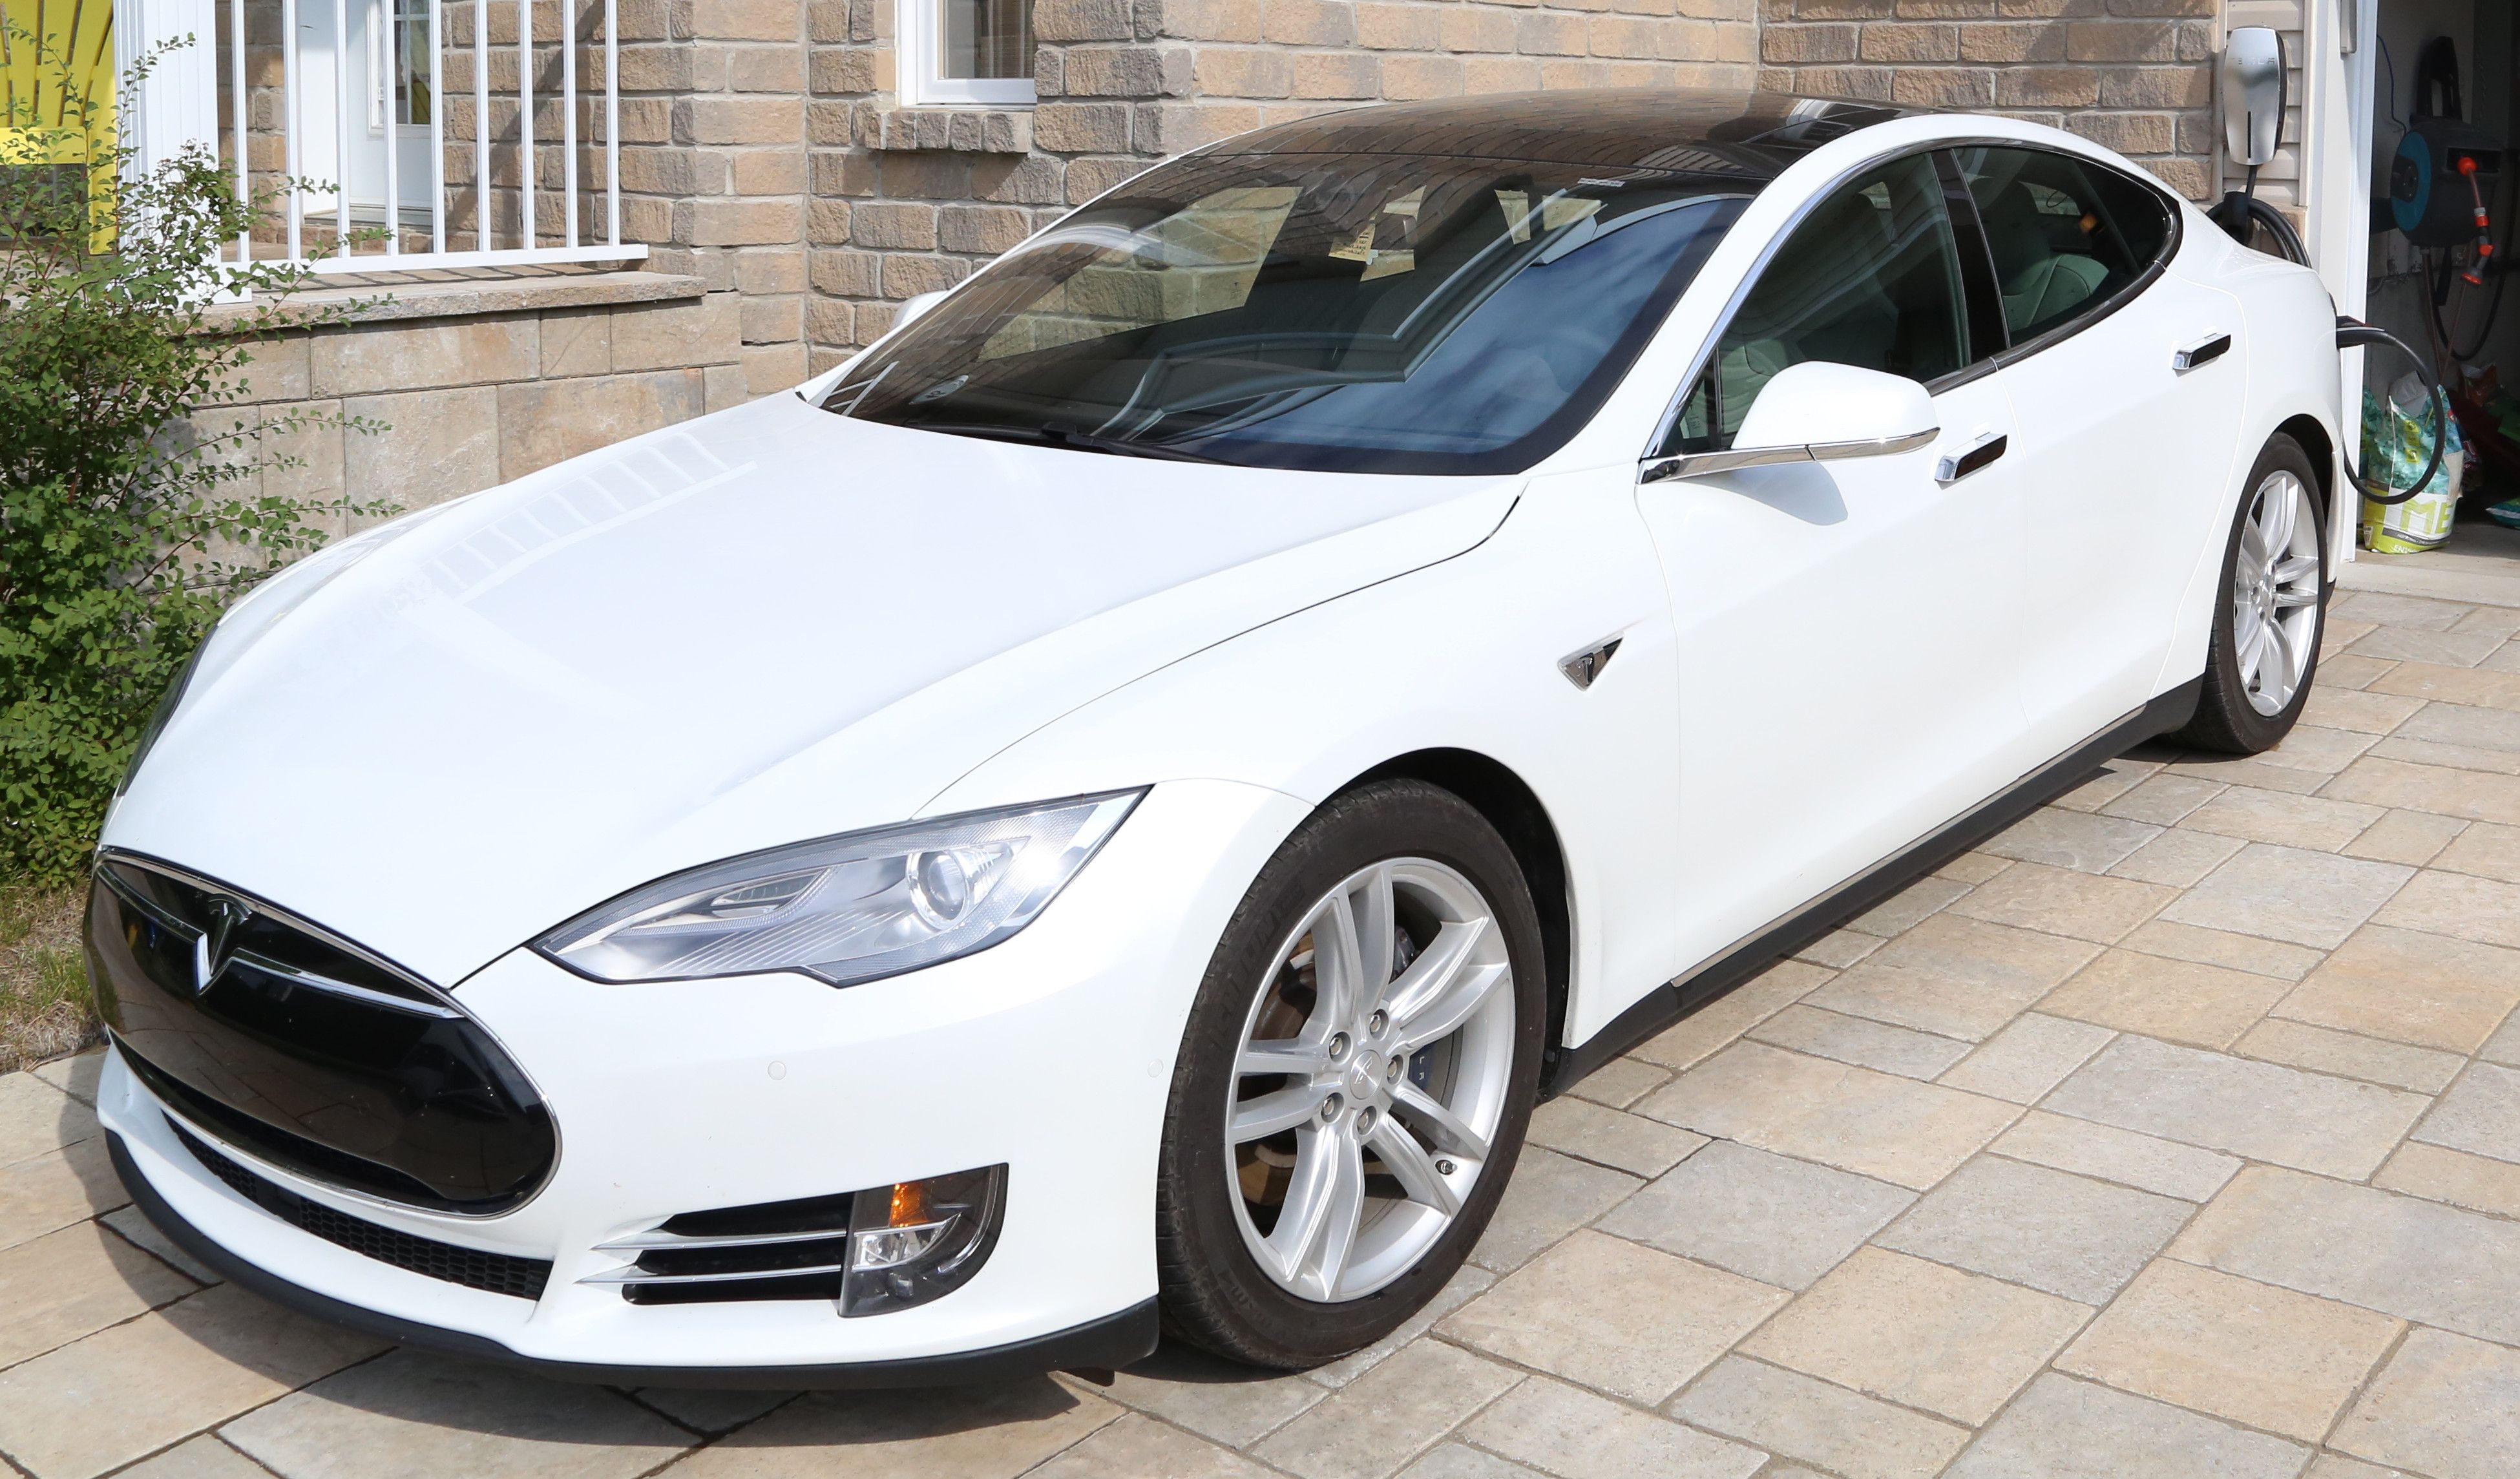
This is a guest blog by Philippe Marseille. In it he explains his installation and setup of an eGauge system with Magnelab current sensors to monitor the power consumption of his Tesla S 85D (when charging), in addition to the overall consumption of his house.
Hi,
I like to track my energy usage (from my panels) for my Tesla charging power usage. I recently switched my old setup which was using an Energy monitor (2 transmitters, 2 circuits monitored) to a full blown eGauge setup, which monitors most of my circuits at home. I wanted to share my experience here so that others could benefit from what I’ve learned.
Disclaimer: I’m not affiliated in any way with eGauge; I did not get a rebate or anything. I simply bought the system over the internet and installed it.
First things first:
What’s an eGauge?
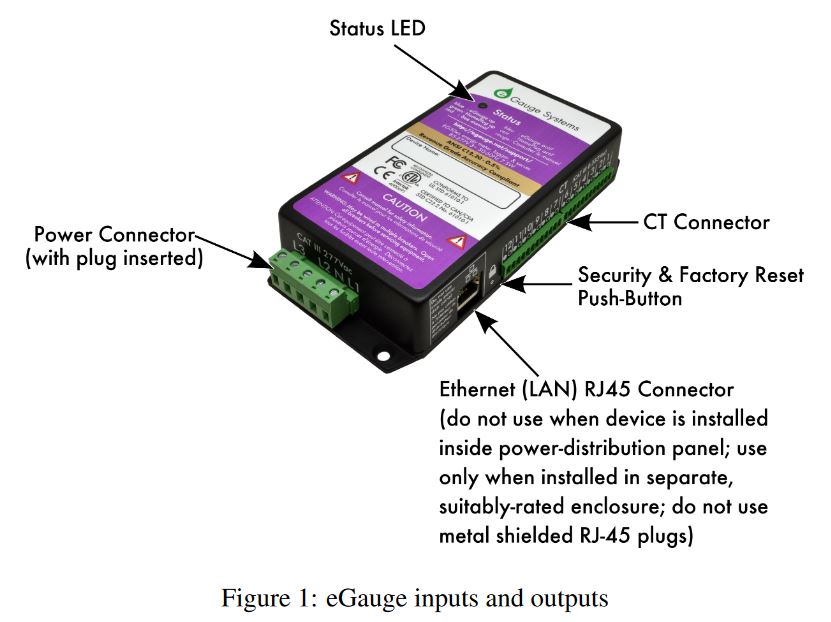
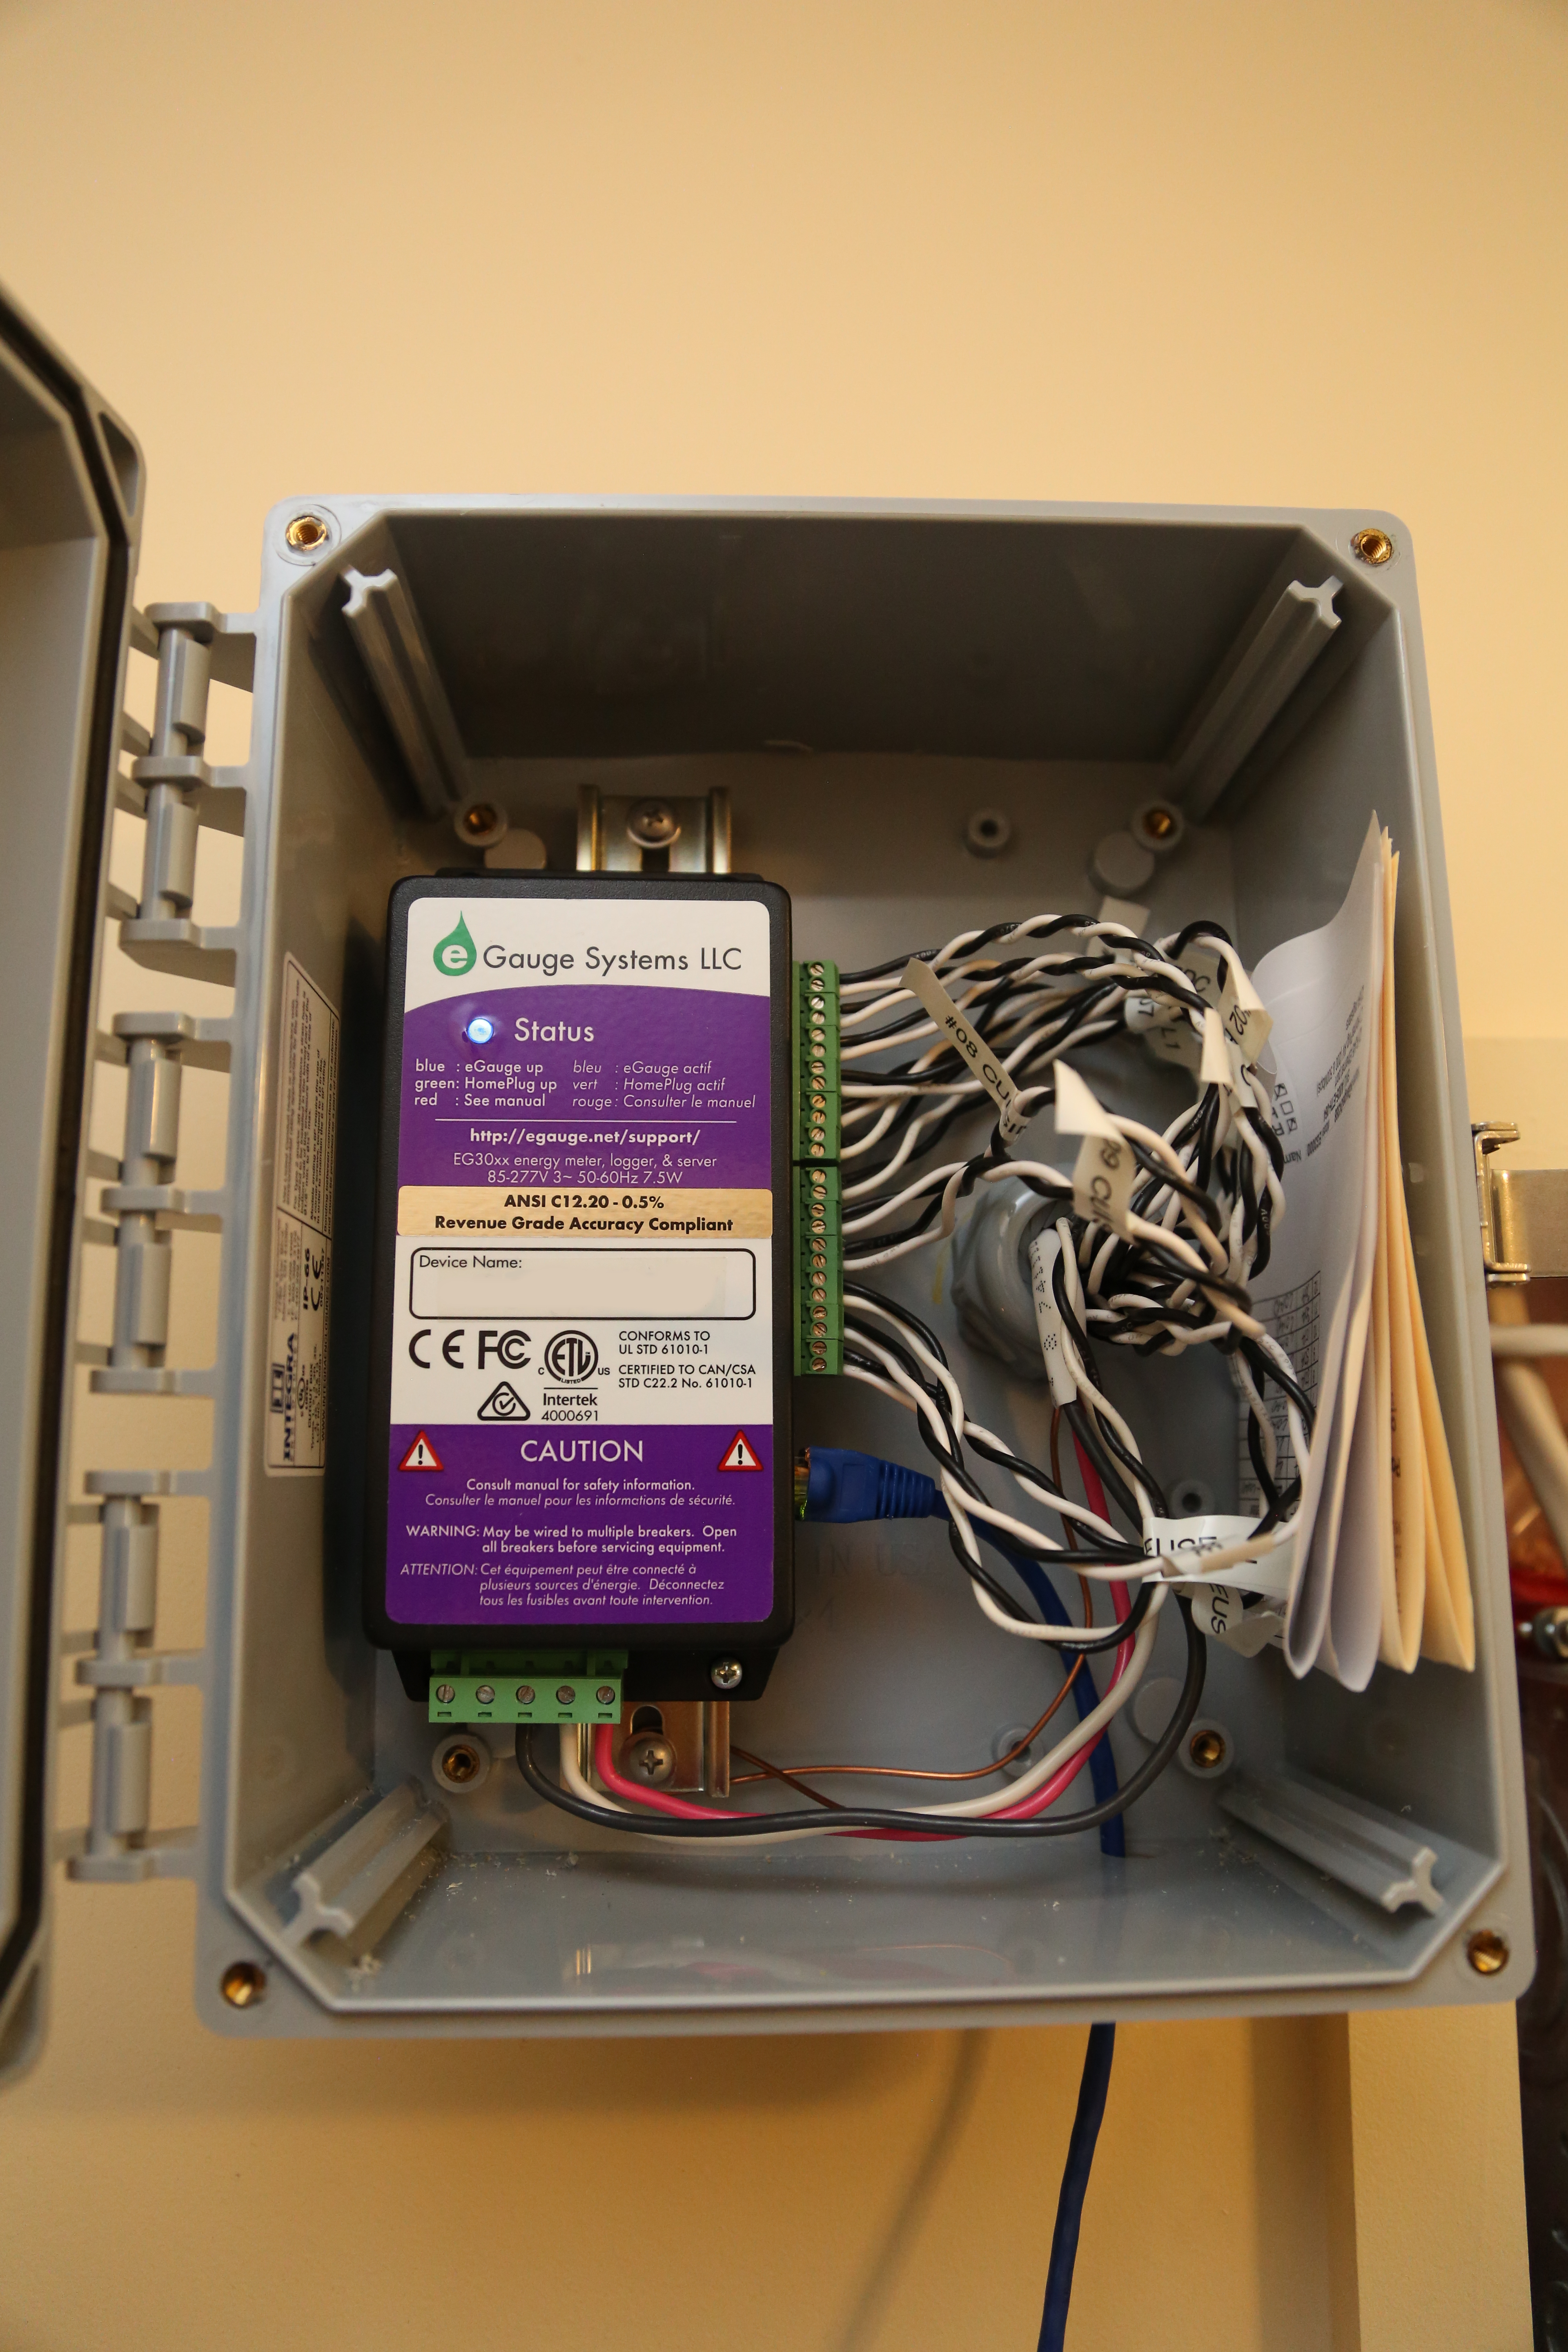
- It consists of a small SOC (I’ve been told it’s a Snapdragon processor) that runs a web server with solid state storage. It stores the data, no external service required
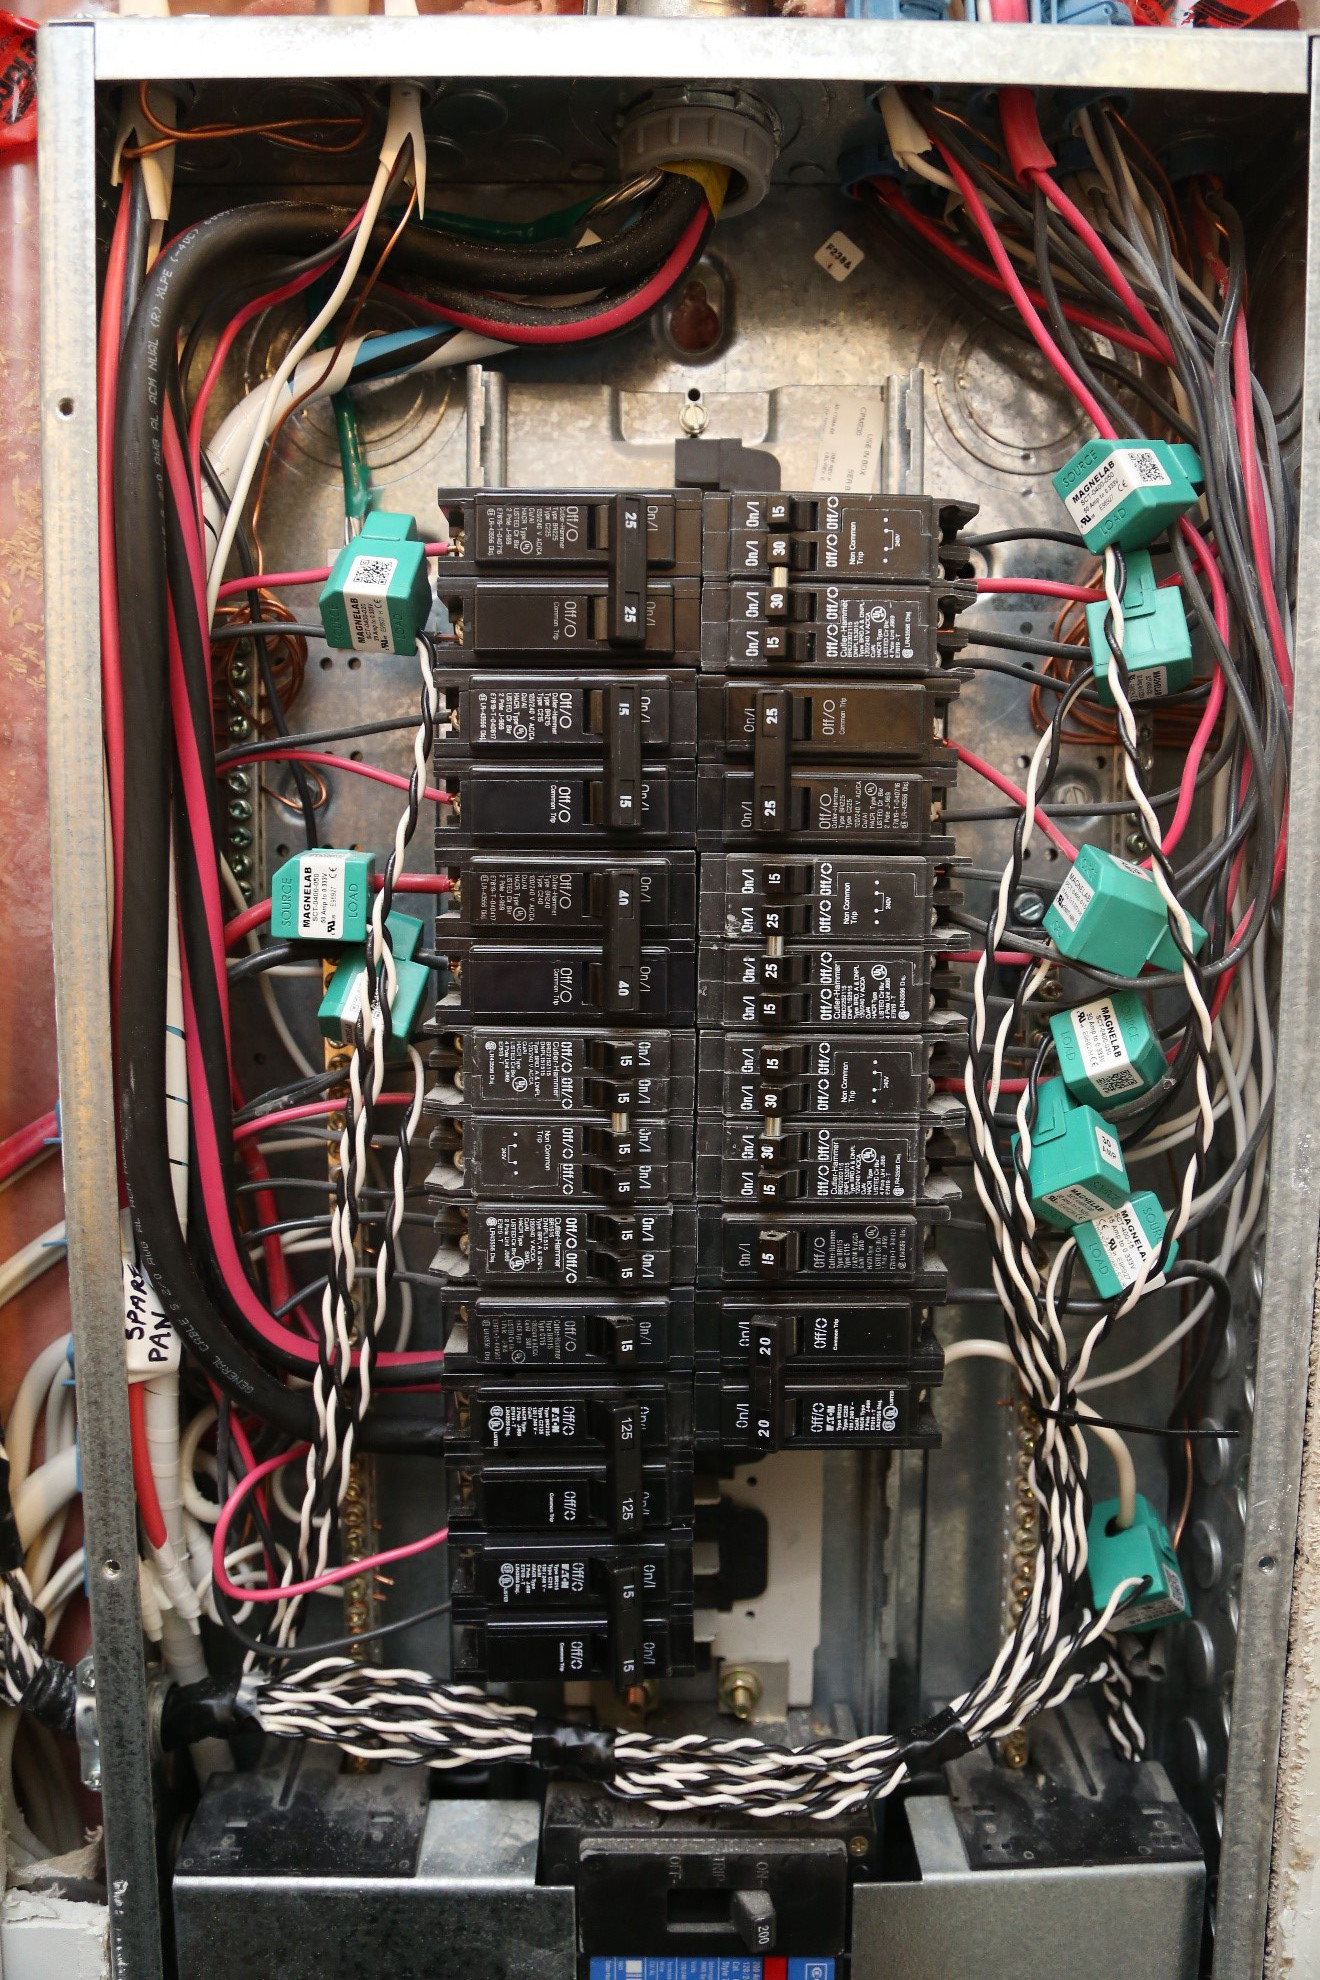
- Each eGauge can monitor 12 channels, which, in most cases, will translate into 12 current transducers. In my case I used a few different split-core current transformers (also called CT’s): some SCT-0400’s by Magnelab and some SCT-075Rs by Magnelab (also sold as the ACT-0750 by Continental Control Systems).
- You need more than 12 channels? No problems, you can add another (or 10!) eGauge units to your setup. Then each one has its own database and web server and you can configure one of your device, the “main” one, to import the value from the secondaries.
- You supply it with power using a new circuit in your panel. Ideally, you should feed it with each phase of your grid connection. Here in US/Canada we mostly use Split Phase systems so it connects to the Neutral bus, the first phase and the 2nd phase. If you have a 3 phase feed, you use the L3 connection for the 3rd phase.
- It’s not big nor small (7″×3.4″×1.2″)
- There are 2 variants :
- EG3000: Ethernet only version : check your regulations but in most cases, if you buy this one, you can’t install it inside the panel (because of the Ethernet cable) and because it is feed by live wires, it must be in an enclosure
- EG3010: Ethernet and HomePlug AV: if you need to install it in your panel, that would be the one to choose. The HomePlug AV (aka Ethernet over power lines) is bonded on the L1 phase connector of the device, really neat: everything is in the panel and you use the Homeplug AV to extract the networking. You can also use the HomePlug AV protocol to have multiple eGauges communicate with each other.
- And 2 registers configurations: a register is a value that is stored over time. Let’s say you want to view/store the L1 voltage, you configure one of your register as “L1 Voltage”. On a 16 registers model, that means you now have 15 registers left. The more registers you have, the less detailed the history will be.
- Both models keep :
- 1 min averages for 1 year
- 1 sec snapshots for 10 minutes
- 16 registers : 15min averages for 29 years
- 64 registers : 1h averages for 6 years
After you’ve configured your device, here is what the homepage (web server running on the device) looks like (sorry, my register names are in French!).
The green line at 4AM is my HPWC with my car set to 64A max.
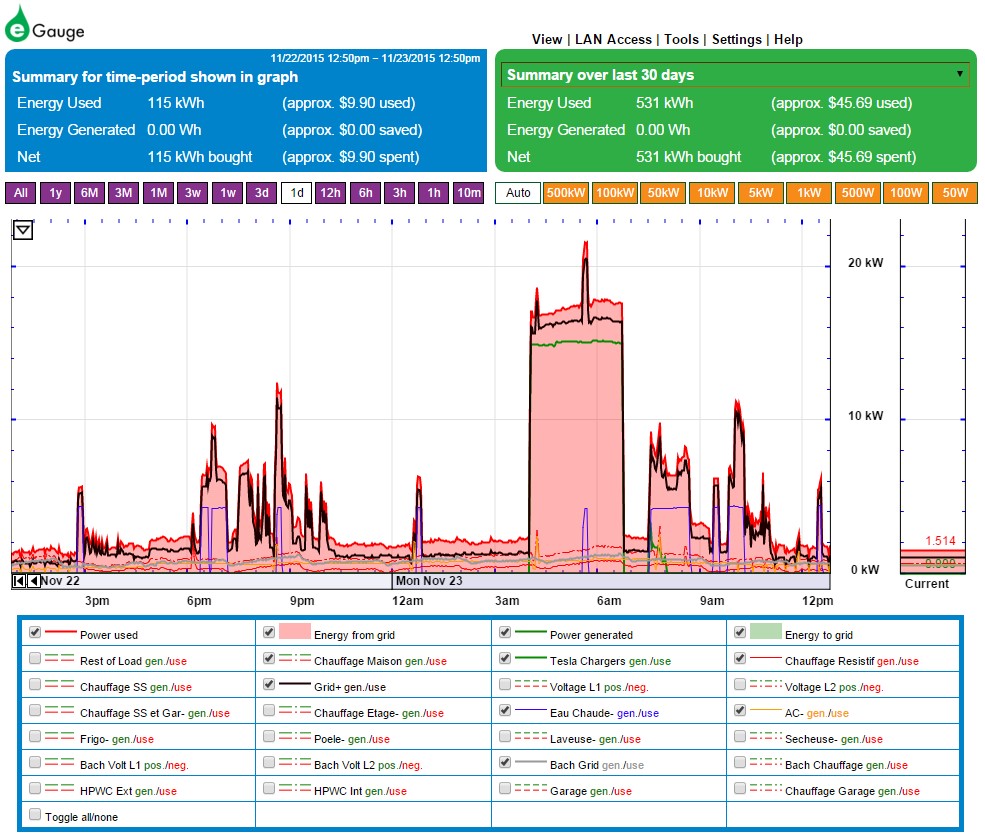
It’s pretty neat: you can change the colors of the lines depending of the flow of current, have some of the lines checked by default, etc.
You can also create views which only show you a subset of the data. I created one that aggregates my heating / cooling circuits so I can get an overview:
-Yellow Orange is my heat pump (Fujitsu 15RLS2)
-Gray is baseboard heating from my apartment
-Black is baseboard heating from my home (most of the heating load is taken by the heat pump except during the night where the basement needs a bit of love!)
-The small green peak at 8:30AM is my garage: I got to work so I opened the garage door, backed the car out and closed the door. The heating kicked in for some time.

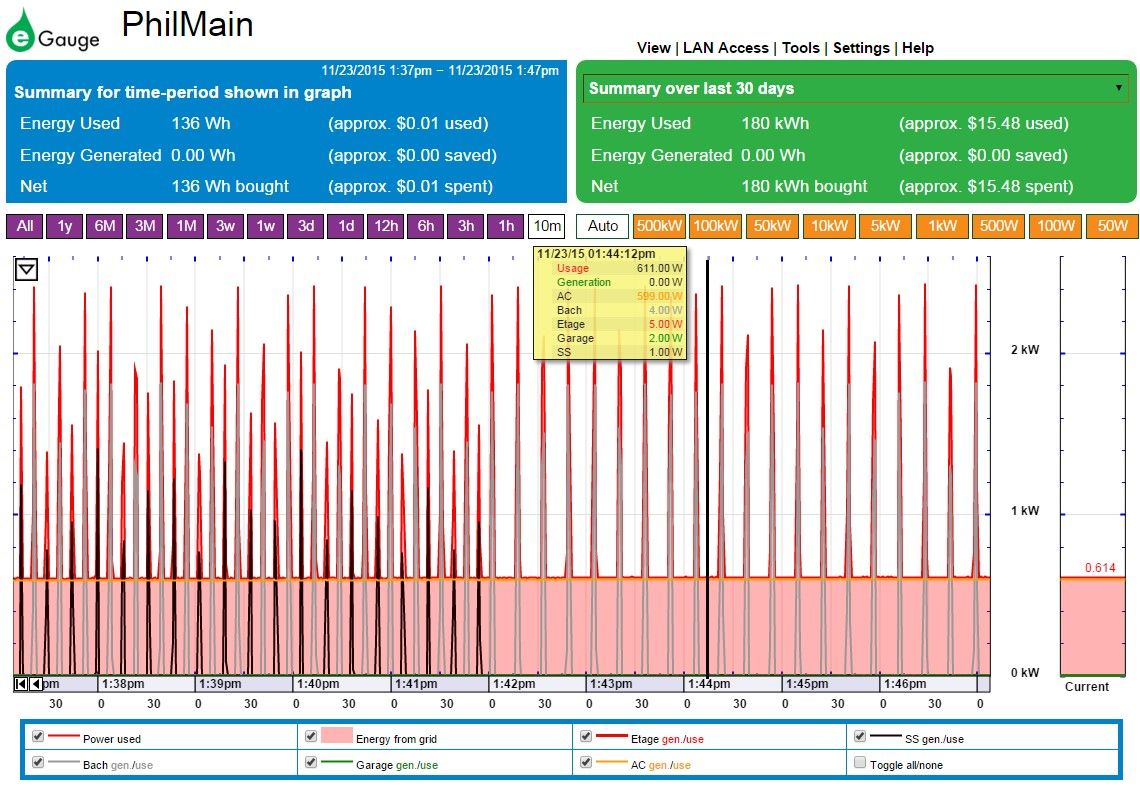
Hold CTRL and over the graph and you’ll get this: (also switched to 1sec snapshots where you can see my baseboard heaters turning on & off)
Installation
Installation is pretty straightforward (on par with most devices like this one). I selected the Ethernet only version because I did not have enough free space in my panel for installation… I like Ethernet anyway. I did get help from an electrician friend because we’re required to here in Quebec… and he’s faster than me when fishing wires and working in a live panel. If regulations would have allowed it, I could have done the installation by myself in 4-5h
- You add a new double-throw breaker (or 2 single throw breaker) to feed the eGauge. You need one on each phase
- You add the split core CT around the circuits you want to monitor (there are several current sensor manufactures)
- Route that into the enclosure
- Trim & connect the split core current transformer wires
- Connect the power wires
- Connect the Ethernet cable
Pictures taken during the installation:
Testing everything before pulling the wires in the conduit:
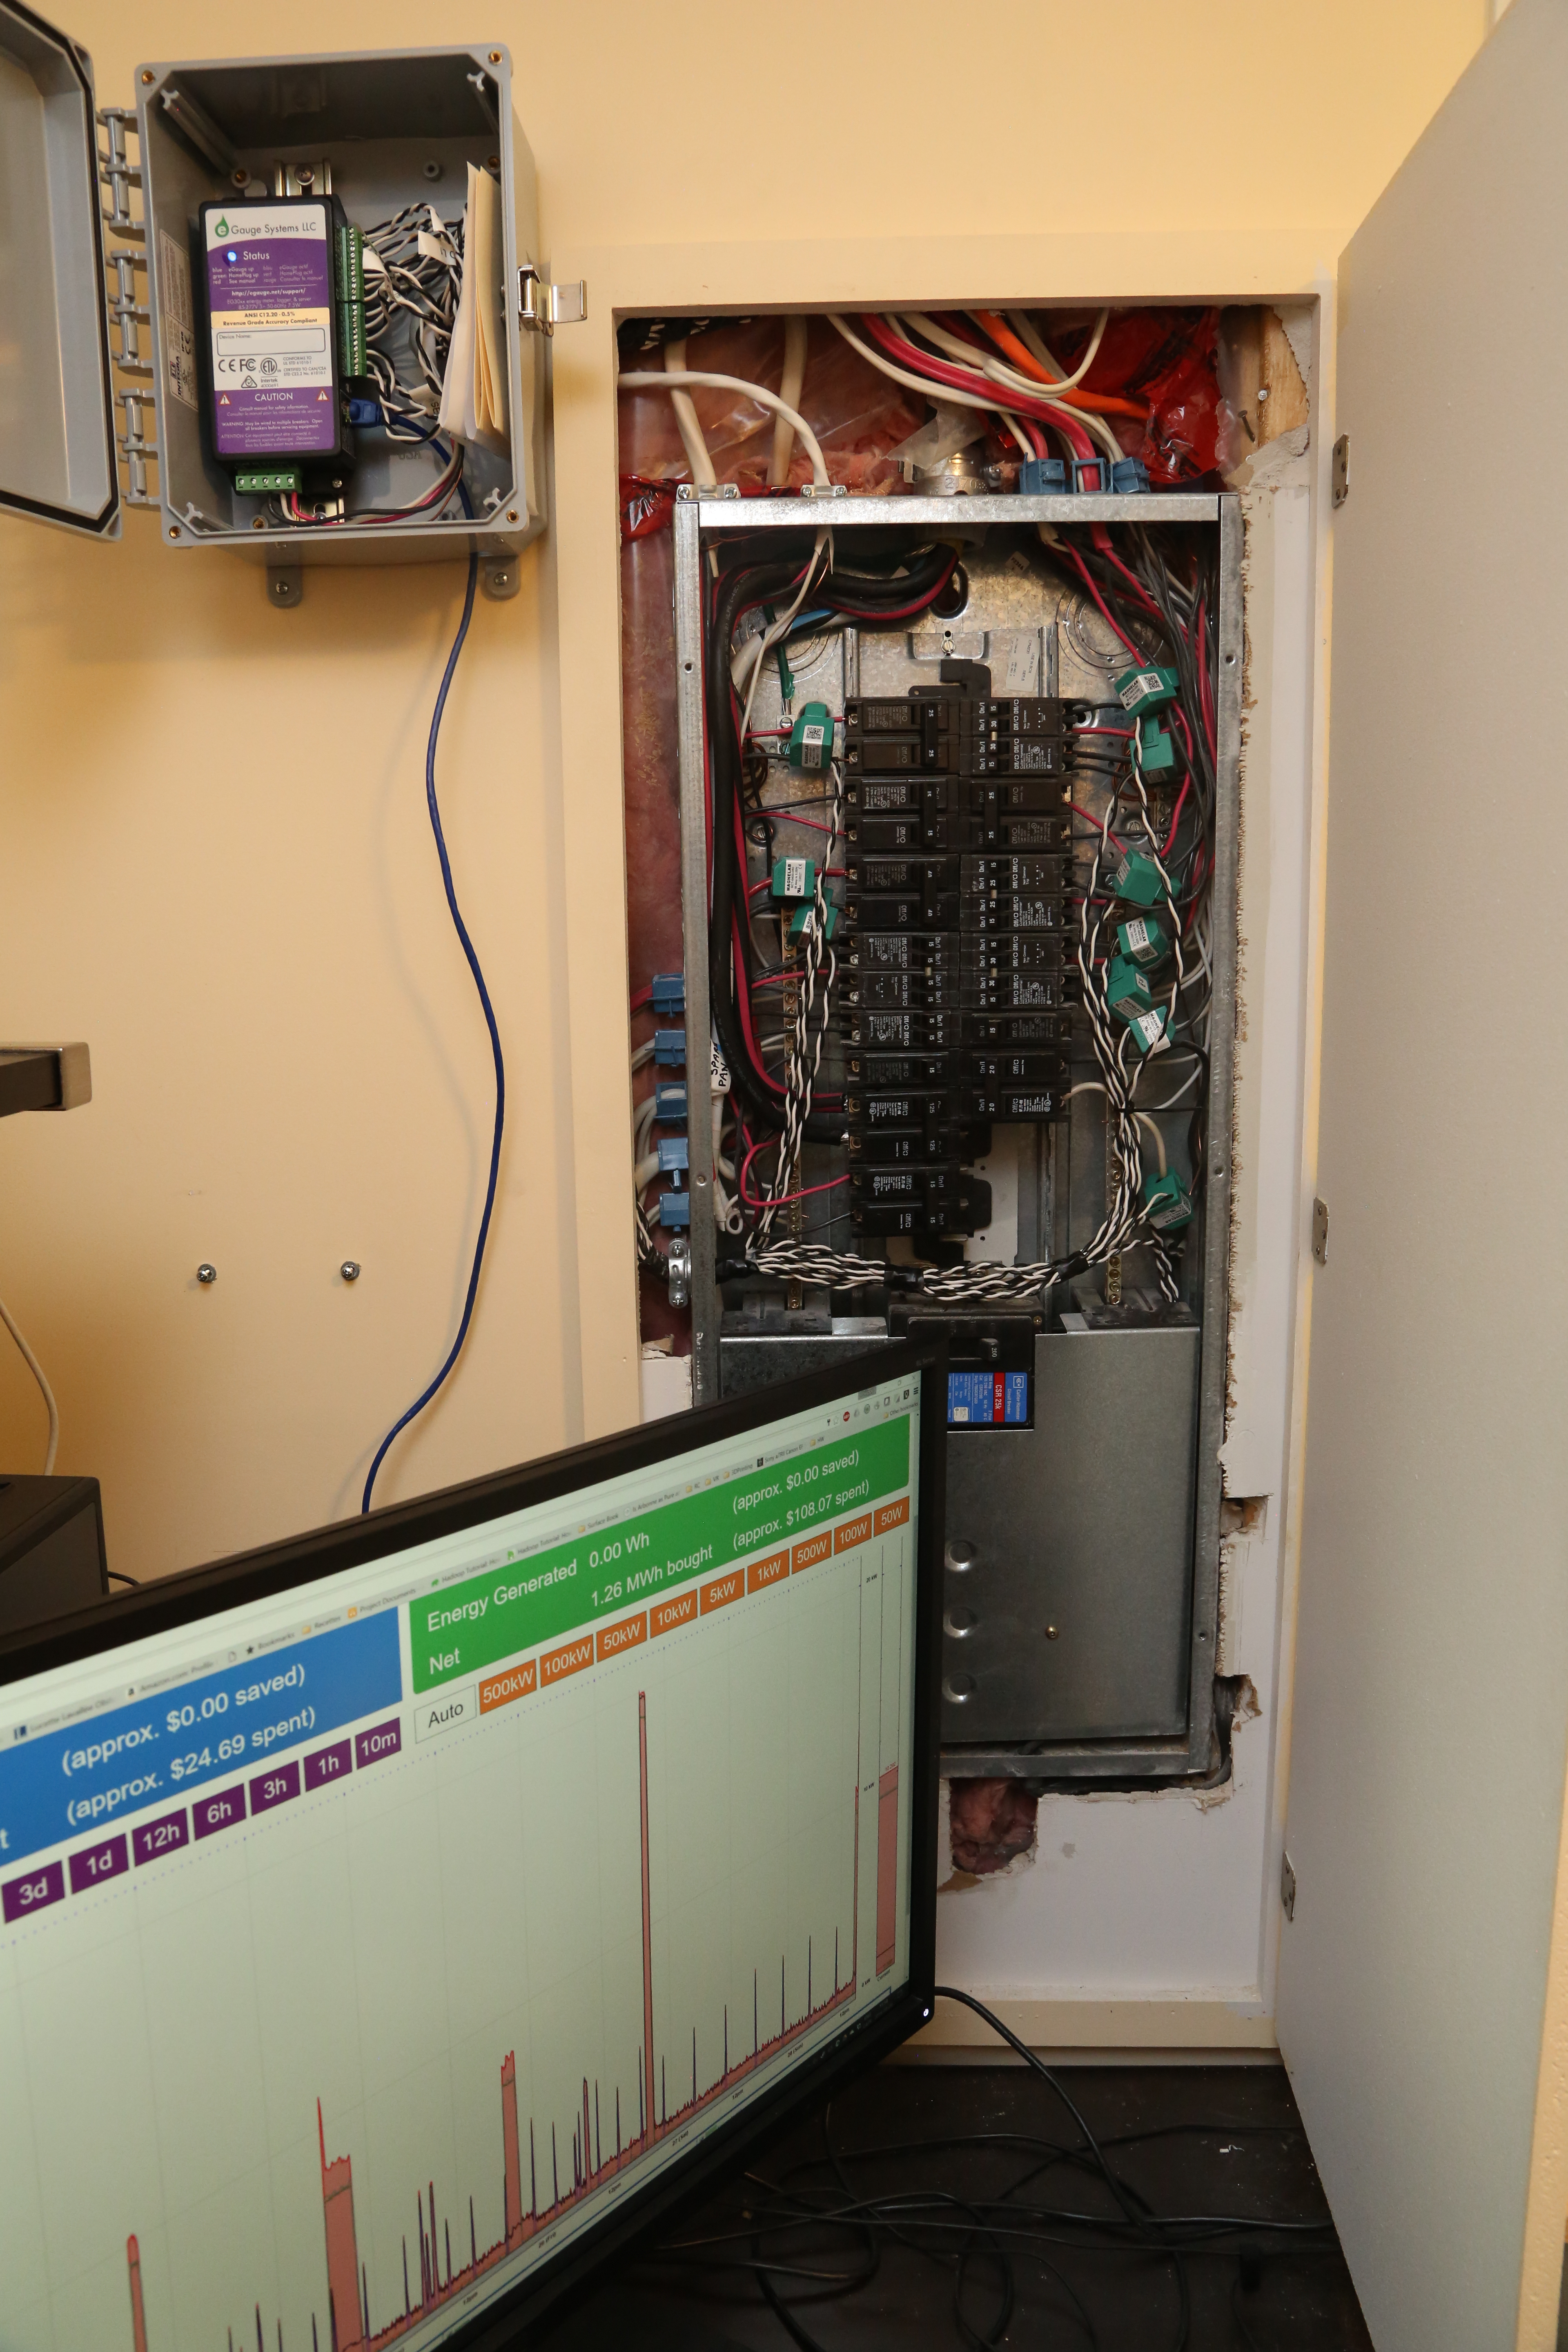
Almost complete result in the enclosure box they sell for the external installation:
Configuration
This is where the fun begins! This is my “installation” Page:
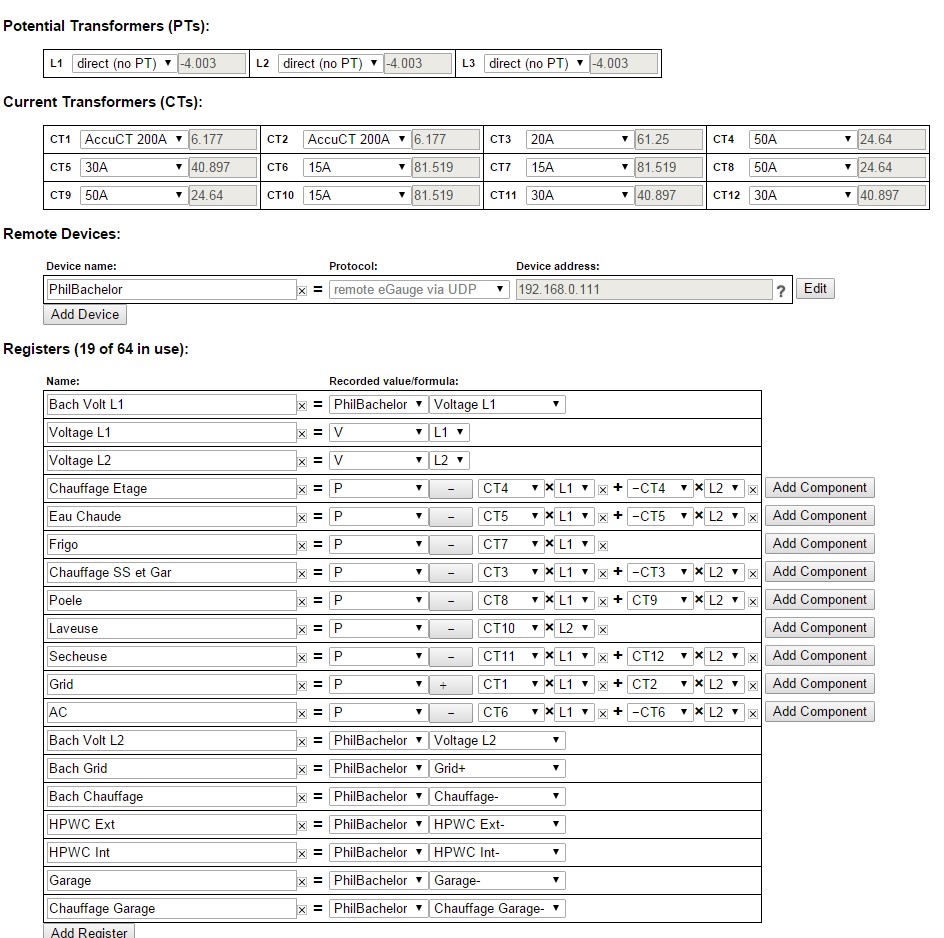

It consists of 5 big sections:
- Potential Transformers (PTs): unless you’re monitoring more than 277V per phase, you don’t need to change anything here. My split phase voltage (120V in my case) is directly feed in the unit so I chose “direct”
- Current Transformers (CTs): this is where you configure the CT rating of each of the channels. I bought revenue-grade AccuCT (same as SCT-075R by Magnelab) for my main panel feed and regular SCT-0400 CTs for the other circuits. You can also select “Custom” and enter the custom factor in the text box
- Remote Devices: this is where I added my 2nd eGauge in my downstairs apartment (I have 2 feed from the grid). It supports a variety of devices, check their website!
- Registers: this is where you select what you want to monitor & store. On single phase loads or balanced 240V loads, you only need 1 split-core current transformer. Look at line #4
- “P” means Power. Power is negative because it takes power from my panel (VS a generator or solar). It’s then CT4 * L1 + -CT * L2.
- Total and Virtual Registers. Those don’t count towards you register limit, they are calculated on the fly by the eGauge.
- Usage and Generation are always there. Since I have 2 feeds from my grid, Usage = “Grid” (Line #11 of my registers) + “Bach Grid” (Line #4, a remote register from my 2nd eGauge unit)
- If you use a dot “.” in the name, the first part becomes a view. e.g. “vChauffage.AC” creates an “AC” line in the “vChauffage” view. I have 5 registers that start with “vChauffage”… they will all show up in this view
- You can do really nice stuff there: add or subtract registers, create complex calculations for billing cycle or other. For example: I have a heating circuit for my basement AND my garage. I put a CT on the breaker and a 2nd CT in the garage, close to the base board. I then created a Virtual Register for “Basement Heating” which is the register “Basement + Garage” MINUS the register “Garage”
Remote Access
eGauge provides a “proxy” service. When the eGauge boots, it opens a TCP connection to their servers. You then get an address similar to “myegauge.egaug.es” where you can access your device. Remember: the web server is running on the device and the data is stored locally… It only creates a tunnel for the data to go through without having to open up your firewalls or having to redirect a port.
CT Selection
When selecting a CT, you need to select the smallest possible (physical dimensions) one for you need. Most circuits will be OK with the 0.4in like the Magnelab SCT-0400 model they sell (should fit over one #2 AWG wire). Bigger gauge will required bigger CTs but I doubt anyone is the USA/Canada will require more than 0.75in like a Magnelab SCT-0750 (which goes up to 4/0 AWG).
When selecting a CT, you also need to select the smallest possible AMP rating for your need. For example: let’s say your electric water heater is on a 30A breaker but will never exceed 20A, it’s preferable to use a 20A CT. The CTs are the most accurate between 10% and 130% of their load rating. This means that a 30A CT will be accurate from 3A up to 33A. By using the lowest possible rating you will maximize your bottom range of usage.
If you need more precision, especially in the lower range of the load, they offer SCT-075R or SCT-075H Cts in 50A, 100A and 200A, all in 0.75″ size. They are rated at a maximum error of 0.5% (that’s a factor 0.002) from 1% up to 100% of their rating. But they cost more.
Tip: if more than one circuit are on the same phase, you can put more than one wire in one CT and it works fine to add up those 2. I did it with baseboard heating circuits.
More details here (official doc) https://www.egauge.net/media/support/docs/egauge-CT-guide.pdf
Pricing Details
If you’ve been following, you know that I’m monitoring 15 circuits and 5 of those are unbalanced so that means I needed 20CTs. One circuit stills needs to be wired (an external 14-50 for when my wife buys her Tesla) so that’s 22 CTs (I know the That the UMC does not use the neutral wire but I want to be sure I get the load correctly so it means 2 CT for a 14-50 for the rare case family comes home and plug in their RV). I also decided to go with the AccuCT/SCT-075R for some of the loads so that I get “revenue grade accuracy”.
Store page: https://www.egauge.net/eos/
This is what I bought (prices are as of this writing, Nov 24th 2015)
-$584ea: EG3000 (A005-ETH-064): this is the Ethernet only model. Bought 2 of those. Base model is $494. (1% precision, no certificate). For $30 more you get the certificate and additional $60 gives you the 0.5% with certificate (which I chose, therefore $584 it is). Direct Link to model info. If you need the HomeplugAV model, add another $50 on top of that to get the hardware inside and you also need the HomePlugAV which is not included (they sell one for $35). The number of register is a software config, it does not change the price.
-$35ea: 0.4in Split Core CTs. Available in a variety of current ratings (same price). There are several Current Sensor Manufacturers, I chose the SCT-0400 from Magnelab. I bought 14 of those for my heating, HVAC, clothe dryer, oven, etc. If you need the 0.75in model, they are slightly more expensive at $46.
-$65ea: 0.75in Split Core AccuCTs or (Magnelab SCT-075R). Available in 50-100-200-250A ratings. Bought 8 of those. Yes, 8! I need 2 on each of my grid connection. 2 for my garage sub-panel and 1 for each of my HPWC (got 2 of those)
-$96ea: 10x8x4 Nema 4 Enclosure to install outside the panel. Nema 4 is overkill in my case since I installed them inside but since they looked nice, I chose to take them
-$0.50/ft: split core CT Wire Extension (600V rated AWG twisted pair). I needed 50ft.
-$36ea: extended warranty on the eGauge. Adds 3 years for a total of 5.
Total was a whopping $2467 but I consider this to be an extreme example (2 grid connections, 2 HPWC, 1 subpanel, lots of sub-circuits, etc etc). This does not include installation time / hardware (around $50-$100 in my case for the wire, conduits, breakers and conduit connectors).
Since installing this project I found that I could buy a very similar setup for around $2165 and saved about 12% at www.aimdynamics.com
If you’re fine with 1% accuracy (you should! I should have been!), you could easily build a base setup like this:
1xA00-ETH-064 eGauge @ $494 (1% no certificate)
1xEnclosure box @ $96 (optional)
2×0.75in CT for your grid connection @ $92
1×0.4 CT for you HPWC @ $35
Total : $717
This setup costs $602 on www.aimdynamics.com again, over 15% less expensive.
Add an additional $15-$50 for the hardware (new breaker, wire, clamps, conduit, etc.)
If you want/can install it in your panel, you can save on the enclosure but the eGauge costs $50 more and you need an Homeplug AV dongle for $35. Total is $85 so $11 less than an external install but you won’t need the conduit so it’s a faster install.
API / Device integration
For a detailed description of the custom API integration please check out the original post here.
No comments yet.